Wednesday, March 16, 2011

Frames in HTML

Frame is a technique in which you can device you HTML browser into multiple sections (each section is called a frame) and display (load) separate web pages in each of them. So you can view multiple pages in a single browser.

To start with frames, one thing you must understand is there needs to be a container page that in itself does not load any webpage, but rather provides a template of frames.

Tags you will need:
<FRAMESET> </FRAMESET>

Attributes:


Cols:
This divides the browser into columns. That is split vertically. The value for this is the percentage division of the browser. For example "50%,50%" specifies that we need two columns each occupying 50% of the page.

Rows:
This divides the browser into rows. That is split horizontally. The value for this is the percentage division of the browser. For example "50%,50%" specifies that we need two rows each occupying 50% of the page.

Border:
Provides the thickness for frames borders.

Example:
<HTML>
 <FRAMESET rows="50%,50%" border="0">
 </FRAMESET>
</HTML>

But only this is not enough, as we have not told the browser which pages to load in the two frames that we just created. For this we need tag:

<FRAME> </FRAME>

Attributes:


Name:
The name of the frame. Very useful when we want a web page to target this particular frame. More on this is coming later.

Src:
The address of the page we will load.

MarginHeight:
The padding (margin) between the border of the frame and the page.

MarginWidth:
The padding (margin) between the border of the frame and the page.

Scrolling:
The scrolling effect for the frame.


Lets look at an example:

<HTML>
 <FRAMESET Rows="50%,50%" border="1">
  <FRAME Name="menu" Src="page1.html" MarginHeight="0" MarginWidth="0" Scrolling="auto">
  <FRAME Name="menu" Src="page2.html" MarginHeight="0" MarginWidth="0" Scrolling="auto">
 </FRAMESET>
</HTML>

WebPage:

As you can see the page is divided into two rows and the two frame tags occupy each of the frame in a sequential manner. So page 1 loads in frame 1 whereas page 2 loads in frame 2.

Lets divide the page into columns.

<HTML>
 <FRAMESET Cols="50%,50%" border="1">
  <FRAME Name="menu" Src="page1.html" MarginHeight="0" MarginWidth="0" Scrolling="auto">
  <FRAME Name="menu" Src="page2.html" MarginHeight="0" MarginWidth="0" Scrolling="auto">
 </FRAMESET>
</HTML>

WebPage:

Having both Rows and Columns in a browser:
Frames can be nested so that we can have a hybrid combination.

<HTML>
 <FRAMESET Cols="40%,*" border="1">
  <FRAME Name="menu" Src="page1.html" MarginHeight="0" MarginWidth="0" Scrolling="auto">
  <FRAMESET Rows="50,50" border="1">
   <FRAME Name="menu" Src="page2.html" MarginHeight="0" MarginWidth="0" Scrolling="auto">
   <FRAME Name="menu" Src="page3.html" MarginHeight="0" MarginWidth="0" Scrolling="auto">
  </FRAMESET>
 </FRAMESET>
</HTML>


WebPage:

Monday, March 7, 2011

Image Mapping

Image mapping is the technique where we break down an image into several hot-spots (image providing link to another page). You may have an image and you want to navigate to different pages by clicking different parts of it. Say for example, a Map. When you click on a country name you would like to visit that particular page. Image mapping allows you to link different parts of an image to different web pages. Lets see how its done.

We have this image divided in to showing 4 color quadrants and we want to link each quadrant to individual pages.


Lets create an image map for this picture.

The tag we need is:
<MAP> </MAP> 

Attributes:


Name: The name of the map.

Along with <MAP> we also need the tag:
<AREA> </AREA> 

Attributes:


Shape: The shape of the hot-spot we need. Ex: Rect, Plygon, Circle.
Coords: The coordinates for the shape, which depends on the shape.
Href: The address of the page we want the link to.
Alt: The tool tip for the link.

Lets see how the map looks like for our example.

<HTML>
 <BODY>
  <Image Src = "imageMapping.gif" UseMap = "#MyMap">
  <Map name = "MyMap">
  <Area Shape = "Rect" Coords = "0,0,100,100" href = "Red.html" Alt = "Red">
  <Area Shape = "Rect" Coords = "100,0,200,100" href = "Yellow.html" Alt = "Yellow">
  <Area Shape = "Rect" Coords = "0,100,100,200" href = "Green.html" Alt = "Green">
  <Area Shape = "Rect" Coords = "100,100,200,200" href = "Blue.html" Alt = "Blue">
  </Map>
 </BODY>
</HTML>


You can notice how the 'Coords' works. In this example, its Left, Top, Right and Bottom (Image is 200 X 200). If you remember in the Image Tag post we saw a "UseMap" attribute. This is the attribute we use to attach an image map to an image with a '#' preceding the name of the map.

So each of the color box is now connected to an individual web page.

Image Mapping with Circle:


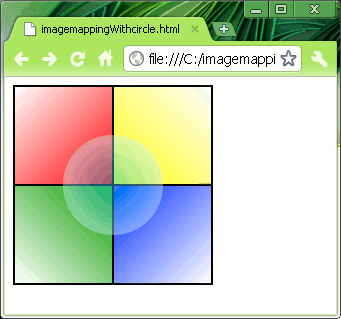
This example shows image mapping with shape as circle. This is easy. Circle takes center and a radius. In this example 100,100 is the X,Y coordinate for the center (of the image) and 50 as the radius. I have highlighted the area for better understanding.

<HTML>
 <BODY>
  <Image Src = "imageMappingWithCircle.gif" UseMap = "#MyMap">
  <Map name = "MyMap">
  <area shape="circle" coords="100,100,50" href="Circle.html" alt="Circle" />
  </Map>
 </BODY>
</HTML>

WebPage:

Tuesday, February 22, 2011

Colspan & Rowspan with HTML Table

This should be interesting.
Once you have a table in your web page often you will require columns or rows that span across the table. For example, lets design a table that looks like:


First thing we need to know is how to span. Lets take a small example:

<HTML>
 <BODY>
  <TABLE Border = "1" Cellpadding = "5" Cellspacing = "5">
   <TR>
    <TD Colspan = "2" Align = "Center">Time Table</TH>
   </TR>
   <TR>
    <TD>Column 1</TD><TD>Column 2</TD>
   </TR>
  </TABLE>
 </BODY>
</HTML>

Web Page:

Notice the attribute "Colspan". We use this attribute to span once cell across many columns, in this case span across 2 columns. Spanning always works from Left to right (Colspan) and Top to bottom (Rowspan). We will see this later. In the example you can see that one cell is missing in the first row. Thats is right, when we want to colspan, the row that contains the cell that will span will have less number of cells (depends on how many column we are spanning), to be precise its
TotalCells = ActualNumberofCells - (SpanningNumber - 1)

Now lets take an example of Rowspan:
<HTML>
 <BODY>
  <TABLE Border = "1" Cellpadding = "5" Cellspacing = "5">
   <TR>
    <TD RowSpan = "2">Hours</TH><TD>Row 1</TH>
   </TR>
   <TR>
    <TD>Tow 2</TD>
   </TR>
  </TABLE>
 </BODY>
</HTML>

Web Page:

Here in the above example you can see that the second row contains only one cell (column 2) because we are spanning the first column, first cell by 2 rows. Recall that it spans only downwards. If you had two cells in the second row and only one in the first, and tried to rowspan the second row first column it would not work.

Now lets combine them and write the HTML code for our time table.
<HTML>
 <BODY>
  <Font Face = "Verdana">
  <TABLE style="border-collapse: collapse;" Border = "1" Cellpadding = "5" Cellspacing = "5">
   <TR>
    <TH Colspan = "6" Align = "center">Time Table</TH>
   </TR>
   <TR>
    <TH Rowspan = "6">Hours</TH>
    <TH>Mon</TH>
    <TH>Tue</TH>
    <TH>Wed</TH>
    <TH>Thu</TH>
    <TH>Fri</TH>
   </TR>
   <TR>
    <TD>Science</TD
    ><TD>Maths</TD>
    <TD>Science</TD>
    <TD>Maths</TD>
    <TD>Arts</TD>
   </TR>
   <TR>
    <TD>Social</TD>
    <TD>History</TD>
    <TD>English</TD>
    <TD>Social</TD>
    <TD>Sports</TD>
   </TR>
   <TR>
    <TH Colspan = "5" Align = "center">Lunch</TH>
   </TR>
   <TR>
    <TD>Science</TD>
    <TD>Maths</TD>
    <TD>Science</TD>
    <TD>Maths</TD>
    <TD Rowspan = "2">Project</TD>
   </TR>
   <TR>
    <TD>Social</TD>
    <TD>History</TD>
    <TD>English</TD>
    <TD>Social</TD>
   </TR>
  </TABLE>
  </Font>
 </BODY>
</HTML>

WebPage:

Notice how cells inside the table like "Lunch" and "Project" are also spanned. I have also added some effects like collapsing the table border and aligning the cell content.

The TABLE Tag!

When you are designing a website you are going to need many tables, in some cases may be as many as 20-30. It is also s good way to control the placement of test and images as there is no (X,Y) coordinate system in HTML. So its good to master it before you jump to building sites.

The tag is

<TABLE></TABLE>

It works by adding rows first and then columns. Rows are added by the tag
<TR></TR>

and columns by the tag

<TD></TD>

So a simple table of 2X2 cells can be formed by:

<HTML>
 <BODY>
  <TABLE Border = "1">
   <TR>
    <TD>First Row First Column</TD>
    <TD>First Row Second Column</TD>
   </TR>
   <TR>
    <TD>Second Row First Column</TD>
    <TD>Second Row Second Column</TD>
   </TR>
  </TABLE>
 </BODY>
</HTML>

The table would look like:


you may notice the "Border" attribute, which is by default set to "0". Now lets see some more attributes that can help in designing the table. best way to learn this is to design a table and then look at the code.

<HTML>
 <BODY>
  <TABLE Border = "1" Cellpadding = "10" Cellspacing = "10" BGColor = "Yellow">
   <TR>
    <TD>First Row First Column</TD>
    <TD>First Row Second Column</TD>
   </TR>
   <TR>
    <TD>Second Row First Column</TD>
    <TD>Second Row Second Column</TD>
   </TR>
  </TABLE>
 </BODY>
</HTML>


CellPadding: The space between the cell borders and its contents.
CellSpacing: the distance between two adjacent cells.
BGColor: The background color for the table (this can be set to each cell individually as show below).

<HTML>
 <BODY>
  <TABLE Border = "1" Cellpadding = "5" Cellspacing = "5">
   <TR>
    <TD BGColor = "Yellow">First Row First Column</TD>
    <TD BGColor = "Red">First Row Second Column</TD>
   </TR>
   <TR>
    <TD BGColor = "Blue"><Font Color = "White">Second Row First Column</Body></TD>
    <TD BGColor = "Green">Second Row Second Column</TD>
   </TR>
  </TABLE>
 </BODY>
</HTML>


There a few more attributes we need to look into.

Table data can be aligned left, right top, bottom or center using Align and VAlign attributed.
The following example shows the use of these attributes:

<HTML>
 <BODY>
  <TABLE Border = "1" Cellpadding = "0" Cellspacing = "5" Width = "100%" Height = "100%">
   <TR>
    <TD Align = "Left">First Row First Column</TD>
    <TD Align = "Right">First Row Second Column</TD>
   </TR>
   <TR>
    <TD VAlign = "Top">Second Row First Column</Body></TD>
    <TD VAlign = "Bottom">Second Row Second Column</TD>
   </TR>
   <TR>
    <TD VAlign = "Top" Align = "Right">Third Row First Column</Body></TD>
    <TD VAlign = "Bottom" Align ="Center">Third Row Second Column</TD>
   </TR>
  </TABLE>
 </BODY>
</HTML>

Web Page:

You can also notice the use of Width and Height attributes in <TABLE< tag. They can be used to set the Width and Height of the table, they take direct numbers and also the percentage values (WRT the web page). As in this case the table spans 100% of the web page.

There is one more this I wanna share before concluding.

Collapsing the table border:


The table border can be ugly the way it is, that is with two lines, one for the cell and one for the border. If you would like to merge them together and let the table have a single line border then use CSS styling: style="border-collapse: collapse;"

We can have:

<HTML>
 <BODY>
  <TABLE style="border-collapse: collapse;" Border = "1" Cellpadding = "0" Cellspacing = "5" Width = "100%" Height = "100%">
   <TR>
    <TD Align = "Left">First Row First Column</TD>
    <TD Align = "Right">First Row Second Column</TD>
   </TR>
   <TR>
    <TD VAlign = "Top">Second Row First Column</Body></TD>
    <TD VAlign = "Bottom">Second Row Second Column</TD>
   </TR>
   <TR>
    <TD VAlign = "Top" Align = "Right">Third Row First Column</Body></TD>
    <TD VAlign = "Bottom" Align ="Center">Third Row Second Column</TD>
   </TR>
  </TABLE>
 </BODY>
</HTML>

Web Page:

Saturday, February 19, 2011

The Image Tag

When you are building a web page you will most likely need to have a lot of images in your page. The <IMG> tag allows you to play with images as there is more to images than just adding then to web pages. You can change there size, give them borders, provide it with a tool-tip etc.


You can add an image by saying:


<IMG SRC = "C:/myImage.gif">


The SRC is the attribute for source where we can provide it with a path of the image.


Here is the code that shows the use of Image Tag:


<HTML>
<BODY>
<IMG SRC = "C:/myHTMLWay.gif">
</BODY>
</HTML>


As you can see the the tag inserted an image into my web page.

Attributes of <IMG> Tag:

ALT: Stands for alternate text. When specified, the alternate text appears in place of the image when the image fails to load. If the image is loaded this acts as a tool-tip.

Border: The border thickness of the image, which by default is set to 0.

Height: The height of the image.

Width: The width of the image.

Align: The alignment of the text adjacent to the image.

UseMap: Specifies the image mapping to be used.

<HTML>
<BODY>
<IMG SRC = "C:/myHTMLWay.gif" ALT = "My HTML Way..." 
                          Border = "1" Height = "100" Width = "100", Align = "Center">
This is the image I created.
</BODY>
</HTML>


Notice how the size of the image is now 100 pixels, and a border appears along the image. Also the text is now aligned at the center of the image.


CSS Styling and HTML

We saw in  my earlier post that anchor tag changes the color and style of the anchor text. We can either change it back to default or make it little more enjoyable by proving some special effects.
For this we need CSS styles.
CSS styling is the most common way to provide styling effects to HTML documents.

CSS styling can be added to HTML in three ways.
1. Add style into the Tag directly as an attribute.
2. Add style in the header section so that it can be used in the entire document (like having a global variable)
3. Have a CSS file for all the styling.

1. CSS style as attribute.
Its a simple way to to style the web page.
For example, you can change the font of the text in the heading tag.

<H1 Style="font-family:verdana">CSS Style</H1>


or have the color and size of the text changed:


<H1 Style="font-family:verdana;color:Blue;font-size:10px;">CSS Style</H1>


You can change the background color for the text:


<Style="background-color:Gray">CSS Style</B>


or change the text alignment to "justified" in HTML


Here is the code and output:

<HTML>
<BODY>
<H1 Style="Font-family:verdana">CSS Style</H1>
<H1 Style="Font-family:verdana;color:Blue">CSS Style<//H1>
<H1 Style="Font-family:verdana;color:Blue;font-size:10px;">CSS Style</H1>
<B Style="Background-color:Gray">CSS Style</B>
</BODY>
</HTML>


2. CSS style in the Header.
The CSS styling can be added to the header section so that it can apply to all the document.
For example, here I show to to add special styling to anchor tag <A>


Providing Special Effects to Anchor Tag:

<HTML>
<HEAD>
<STYLE type="text/css">
A:link { COLOR: Blue; TEXT-DECORATION: None; font-weight: Normal }
A:visited { COLOR: Darkred; TEXT-DECORATION: None; font-weight: Normal }
A:active { COLOR: Blue; TEXT-DECORATION: None}
A:hover { COLOR: Red; TEXT-DECORATION: None; font-weight: Bold }
</STYLE>
</HEAD>
<BODY>
This is the link to 
<A href = "http://www.vijaykamat-html.blogspot.com">
My Blog
</A>
</BODY>
</HTML>

As you can see in the code that I want the color of the anchor text to be Blue by default, change to DarRed if the link is already visited once, Blue again when it is active and Red when the mouse hovers over it. I also change the text to bold on mouse hovering.

So anywhere there is anchor tag in the document, this style would apply an you will see all anchor texts have this special styling to them:


3. CSS style in a .css file (Importing .css file).
We can also write all the styling code in a file, save it with .css extension and import that file into out webpage. This is a good idea when you have a lot of styling to do so that HTML and CSS can be separated.
Here I have stored the anchor tag styling to a file called anchorStyle.css. I import that file into my HTML like this:

<HTML>
<HEAD>
<STYLE type="text/css">
@import url("C:/anchorStyle.css");
</STYLE>
</HEAD>
<BODY>
      This is the link to 
<A href "http://www.vijaykamat-html.blogspot.com">
My Blog
</A>
</BODY>
</HTML>

You can play with the style to have some great effects to your web page.

The Anchor Tag

The meaning of Hypertext Markup Language is the language used to build pages that are connected to each other (Hypertext pages). To achieve this connectivity HTML provides us with "Anchor" tag. Its called anchor tag as it provides an anchor on the page. The syntax looks like:


<A href = "Destination_Page">Text/Image as anchor <A>
where "href" stands for Hyper reference.


This is the code showing the use of anchor tag.


<HTML>
<BODY>
This is the link to <A href = "http://www.vijaykamat-html.blogspot.com">My Blog</A>
</BODY>
</HTML>


As you can notice the text "My Blog" is now an active link to the address mentioned in the href attributes value,
You may also notice that the text also changes color and is now underlined. This can be changed to any other color using the FONT tag:


<HTML>
<BODY>
This is the link to 
<A href = "http://www.vijaykamat-html.blogspot.com">
<FONT Color = "Black">My Blog</FONT>
</A>
</BODY>
</HTML>


The other aspects can also be changed, like for example we can add a little special effect, and for that we need styles, which is explained here: http://vijaykamat-html.blogspot.com/2011/02/css-styling-and-html.html


Linking within the same page:


Often you will require to provide links to traverse within the same web page. For example, when user reaches the end of the page may be you want to provide a link to the top of the page. This can easily be done with NAME attribute of the Anchor tag. Lets take an example. Below you can see a page where the top of the page is marked with a name. Later the text "Top" is linked to this area so a click takes user to the top of the page.

<HTML>
 <BODY>
  <A Name = "Top">
  <Font Face = "Verdana" Size = "2">This is the top of the page.</Font>
  <BR><BR><BR><BR><BR><BR><BR><BR><BR><BR>
  <BR><BR><BR><BR><BR><BR><BR><BR><BR><BR>
  <BR><BR><BR><BR><BR><BR><BR><BR><BR><BR>
  <A href = "#Top">"Top"</A>
 </BODY>
</HTML>

Web Page:
Notice how the name must start with a "#" symbol when used in Anchor tag.

Sunday, February 13, 2011

Other Formatting Tags

Other than the formatting that we have seen so far like <B> <FONT> etc there are other tags which come in handy some times.
Here the code and the output, which is self explanatory.


Heading Tag:


<HTML>
   <BODY>
<H1>Heading</H1>
<H2>Heading</H2>
<H3>Heading</H3>
<H4>Heading</H4>
<H5>Heading</H5>
<H6>Heading</H6>
   </BODY>
</HTML>


Other Formatting Tag:


<HTML>
   <BODY>
<BIG>Big Text</BIG><BR>
<EM>Emphasized Text</EM><BR>
<SMALL>Small Text</SMALL><BR>
<STRONG>Strong Text</STRONG><BR>
This is <SUB> subscript </SUB><BR>
This is <SUP>superscript</SUP><BR>
I am <DEL>26</DEL> <INS>27</INS>
   </BODY>
</HTML>


The almighty FONT tag!

The <FONT> tag is ht most heavily used formatting tags. It allows you to change the size, color and font (called face in HTML) of the text.


Its easy to use it. Enclose the text withing a FONT tag pair and set some attributes.


<FONT Color = "Light Blue"> This is getting exciting! </FONT>


This will change the color of the text to Light Blue. We can set any valid color to the text.
One important thing about color attribute is that it also accepts hash code for a color.


<FONT Color = "#0000FF"> This is getting exciting! </FONT>
has the same effect as the first line as #0000FF is he hash code for light blue.


You may have notices the word "attribute". Almost all tags in HTML offer attributes, which can be set with values. Here in this case color is an attribute and blue is the value set.
HTML is not case sensitive, so we ca write the tags/attributes/values in upper/lower/title or any other case we want. But as a good programming practice always use capitals for tags.


Font tag bears more than one attribute. Next we see another important attribute "Size".


We can change the font size of the text using the size attribute.


<FONT Size= "3"> This is getting exciting! </FONT>


Size can have a value starting from 1 up to 7.


The third attribute the font takes is the "face".


<FONT Face= "Arial"> This is getting exciting! </FONT>


will make the text have arial font.


You can use them in any combination you like.


The following code:


<HTML>
   <BODY>
<FONT Size= "1Color = "Light Blue"> This is getting exciting! </FONT ><BR>
<FONT Size= "2Color = "#0000FF"> This is getting exciting! </FONT ><BR>
<FONT Size= "3Face = "Arial"> This is getting exciting! </FONT ><BR>
<FONT Size= "4Face = "Arial" Color = "Red"> This is getting exciting! </FONT ><BR>
<FONT Size= "5"> This is getting exciting! </FONT ><BR>
<FONT Size= "6Face = "Verdana"> This is getting exciting! </FONT ><BR>
<FONT Size= "7Color = "Steel Blue4"> This is getting exciting! </FONT >
   </BODY>
</HTML>


Gives this output:


Notice that the last line is actually size 7 but in default font face (Times New Roman) which is smaller that Verdana size 6.


Saturday, February 12, 2011

Simple Formatting in HTML

To start with simple formatting we have <B><I><U> (Each of which have their closing tags of-course)


As you might have guessed any text put between <B> and </B> will turn bold. <I> will make it italic and <U> to have it underlined.


So for the code below:


<HTML>
   <BODY>
      Welcome to the world of HTML.
 <B>This text is bold. </B>
 <I>This text is italic. </I>
 <U>This text is underlined. </U>
   </BODY>
</HTML>


The output should be:


Wait! There is something wrong here! Everything appears to be put on the same line.
Yes, Web browsers can not tell / interpret that you want text on separate lines until you tell it.
So tell it.


<HTML>
   <BODY>
      Welcome to the world of HTML.<BR>
  <B>This text is bold. </B><BR>
  <I>This text is italic. </I><BR>
  <U>This text is underlined. </U><BR>
   </BODY>
</HTML>


So you see:


As you can see the tab <BR> causes the browser to put a newline wherever it encounters it. And as you have rightly guessed its one of those tags that do not have a closing pair (How can you have a closing tag for a newline character anyway!).


In summary:
<B></B> For Bold text
<I></I>     For Italic text
<U></U> For Underlined text
<BR>       A New-line character